Ctrl+K
 Latest documentation - Home  Latest documentation - Home

User Home Pages

  • Community
    • Open edX Platform Release Notes
      • Sumac: The Current Release
        • Sumac Release Notes
        • Sumac Developer & Operator Release Notes
      • Teak: June 2025 Release
        • Teak Release Notes
        • Teak Developer & Operator Release Notes
      • Ulmo: December 2025 Release
        • Ulmo Release Notes
        • Ulmo Developer & Operator Release Notes
      • Unsupported Open edX Releases
        • Open edX Redwood Release
        • Open edX Quince Release
        • Open edX Palm Release
        • Open edX Olive Release
        • Open edX Nutmeg Release
        • Open edX Maple Release
        • Open edX Lilac Release
        • Open edX Koa Release
        • Open edX Juniper Release
        • Open edX Ironwood Release
        • Open edX Hawthorn Release
        • Open edX Ginkgo Release
        • Open edX Ficus Release
        • Open edX Eucalyptus Release
        • Open edX Dogwood Release
        • Open edX Cypress Release
        • Open edX Birch Release
      • Site Operators: Named Release Branches and Tags
    • Open edX Security Policy
    • Receive Open edX Platform Announcements by Email
  • Educators
  • Site Operators
    • Site Operators: Quick Start
    • Site Operators: How-tos
      • How to Enable a Waffle Flag for a User
      • Configuring Google Analytics
      • Use A Frontend Plugin Framework Slot
    • Site Operators: Concepts
    • Site Operators: References
      • Available Frontend Plugin Slots
  • Developers
    • Maintainers Home
  • Documentors
  • Translators
    • Get Started as a Translator
      • Quick Start: How to start translating for Open edX
    • How to fix translation validation errors
    • How to join a review team
    • How to join a translation team
    • How to request a new language for translation
    • Working With HTML
    • Working With Placeholders
    • Translators: Reference

Quick Starts

  • Educators: Build a Course
  • Site Operators: Set up Open edX
  • Developers: Contribute to Open edX
    • Quick Start: First Open edX Pull Request
  • Documentors: First Documentation PR

Open Source Community

  • Current Release: Sumac
    • Sumac Release Notes
      • Content Libraries Redesign - Beta
      • Customizing Site Header Using Frontend “Slots”
      • Customizing Learner Dashboard Using Frontend “Slots”
      • Aspects Course Comparison Dashboard
      • Sidebar Navigation Release Notes (Sumac)
      • Simple example: Removing help button
    • Sumac Developer & Operator Release Notes
  • All Release Notes
    • Sumac: The Current Release
      • Sumac Release Notes
        • Content Libraries Redesign - Beta
        • Customizing Site Header Using Frontend “Slots”
        • Customizing Learner Dashboard Using Frontend “Slots”
        • Aspects Course Comparison Dashboard
        • Sidebar Navigation Release Notes (Sumac)
        • Simple example: Removing help button
      • Sumac Developer & Operator Release Notes
    • Teak: June 2025 Release
      • Teak Release Notes
        • Stay Up To Date with Teak
        • Content Libraries - Unit Support
        • Design Tokens (New Theming System)
        • Aspects Updates
      • Teak Developer & Operator Release Notes
    • Ulmo: December 2025 Release
      • Ulmo Release Notes
      • Ulmo Developer & Operator Release Notes
    • Unsupported Open edX Releases
      • Open edX Redwood Release
        • Redwood Release Notes
        • Redwood Developer & Operator Release Notes
      • Open edX Quince Release
        • Open edX Quince Release - Feature-Based Notes
        • Open edX Quince Release - Developer & Operator Notes
      • Open edX Palm Release
        • Open edX Palm Release - Feature-Based Notes
        • Open edX Palm Release - Developer & Operator Notes
      • Open edX Olive Release
        • Open edX Olive Release - Feature-Based Notes
        • Open edX Olive Release
      • Open edX Nutmeg Release
      • Open edX Maple Release
      • Open edX Lilac Release
      • Open edX Koa Release
      • Open edX Juniper Release
        • 1. Juniper release notes: Learner Experiences
        • 2. Juniper release notes: Educator Experiences
        • 3. Juniper release notes: Developer Experiences
      • Open edX Ironwood Release
      • Open edX Hawthorn Release
      • Open edX Ginkgo Release
      • Open edX Ficus Release
      • Open edX Eucalyptus Release
        • Enabling the Bulk Email Feature
        • Replacing the courseware_studentmodulehistory Table
      • Open edX Dogwood Release
      • Open edX Cypress Release
      • Open edX Birch Release
    • Site Operators: Named Release Branches and Tags
  • How to Contribute
  • OEPs (Open edX Proposals): Community Decision Documents

Site Operators: Deploy And Run An Open edX Site

  • Quickstarts
  • How-tos
    • How to Enable a Waffle Flag for a User
    • Configuring Google Analytics
    • Use A Frontend Plugin Framework Slot
  • Concepts
  • Reference
    • Available Frontend Plugin Slots

Software Developers: Enhance the Open edX Platform

  • Quickstarts
    • Quick Start: First Open edX Pull Request
  • How-tos
    • How To Add a Catalog File
    • How To Add Sphinx Docs to a Repo
    • How To Enable Javascript Upgrade Automation
    • How To Enable Python Upgrade Automation
    • Enabling Translations on a New Repo
    • How To Get Ready for Frontend Development
    • How To Get Ready for Python Development
    • How-to get your repository docs on docs.openedx.org
    • How To Maintain a Repository
    • Maintaining Translations on Your Repo
    • Ongoing Maintainer’s Tasks
    • How to Switch to the sphinx-book-theme for Documentation
    • How to Set Up Github Action to Monitor Python Coverage
  • Concepts
    • Open edX Accessibility Concepts
    • Backend Layout and Approach
    • Hooks Extension Framework
    • OEP-58 Overview
    • Platform Overview
  • Reference
    • Running Pull Request Tests
    • Tools for Maintainers
    • Open edX Accessibility Reference
    • Event Reference
      • Events in the Tracking Logs
        • Reviewing a Sample Event
        • Common Fields
        • Student Events
        • Course Team Events
      • xAPI Events
      • Caliper Events
      • Alphabetical Tracking Log Event List
    • Open edX Developer’s Guide
      • Open edX Platform Architecture
      • Contributing to the Open edX Project
        • Process for Contributing Code
        • Contributing
        • Landing Your Work
        • Code Considerations
        • Overview of Review Process for Community Contributions
        • Pull Request Status Guide
        • Core Contributors to the Open edX Project
      • Extending the edX Platform
        • Options for Extending the Open edX Platform
        • Integrating XBlocks with edx-platform
      • Testing
        • Open edX Browser Support
        • GitHub Actions
        • Code Coverage
        • Code Quality
      • Analytics
      • Writing Good Code
        • Django Good Practices
        • Frontend Good Practices
      • Writing Code for Internationalization
        • Internationalization Coding Guidelines
      • Preventing Cross Site Scripting Vulnerabilities
        • Preventing Cross Site Scripting Vulnerabilities
        • Preventing XSS by Stripping HTML Tags
        • Preventing XSS in Django Templates
        • Preventing XSS in React
      • Language Style Guidelines
        • Open edX JavaScript Style Guide
        • Open edX Python Style Guide
        • Open edX Sass Style Guide
    • Glossary
    • Aspects: Learner analytics for the Open edX Platform

Documentors: Document the Open edX Platform

  • Quickstarts
    • Quick Start: First Documentation PR
    • Quick Start: Add New Documentation Through GitHub
    • Quick Start: Update Existing Docs Through GitHub
  • How-tos
    • Add New Documentation via GitHub
    • Make Changes to your Pull Request
    • Update An Existing Doc via GitHub
  • Concepts
    • Open edX Diataxis Guide
    • Documentation Audiences
  • References
    • Documentation Checklist
    • Guidelines for Writing Global English
    • Getting Started
    • Add Links in a Topic
    • Media Accessibility
    • Open edX Documentation Writing Style Guide
    • Documentation Templates
      • Templates
        • Concept Document Template
        • Reference Document Template
        • How-To Document Template
        • Quickstart Document Template
    • Sample Document with Errors
    • Quick Reference: Writing RST
    • Open edX Document Templates
      • Concept Document Template
      • Reference Document Template
      • How-To Document Template
      • Quickstart Document Template

Translators: Translate the Open edX Platform

  • Quickstarts
    • Quick Start: How to start translating for Open edX
  • How-tos
    • How to fix translation validation errors
    • How to join a review team
    • How to join a translation team
    • How to request a new language for translation
  • Concepts
    • Translations Process
    • Working With HTML
    • Working With Placeholders
  • References

Other Topics

  • Documentation Feedback Form
  • Getting Help
  • Technical Decisions About This Site
    • 1. Purpose of this Repo
    • 2. Choosing RST
    • 3. Documentation Layout
    • 4. Don't Use AutoSectionLabel Extension
    • 5. Use Markdown READMEs for repos published to npm
    • 6. Remove Course Operators persona
  • Aspects: Learner analytics for the Open edX Platform


Open edX Wiki
Open edX website
Cookie Policy
Security Policy
  • Repository
  • Suggest edit
  • Open issue
  • .rst

Add Link to Website, Course Unit, or a File

Contents

  • Add a Link in a Text Component
    • Add a Link to a Website
    • Add a Link to a Course Unit
    • Add a Link to a File

Add Link to Website, Course Unit, or a File#

Tags: educator reference

Add a Link in a Text Component#

When you use the visual editor, to add a link to a website, course unit, or file in a Text component, you work with the Insert link dialog box.

For more information, see the following tasks.

  • Add a Link to a Website

  • Add a Link to a Course Unit

  • Add a Link to a File

Add a Link to a Website#

  1. Select the text that you want to use as the link text.

  2. Select the link icon in the toolbar.

  3. In the Insert/Edit link dialog box, enter the URL of the website that is the destination for your link in the URL field.

  4. If you want the link to open in a new window, select the dropdown arrow next to the Open Link In… field, and then select New Window. If not, you can leave the default value.

  5. Select OK.

  6. Save the Text component.

  7. To test the link, select View Live Version or Preview. When the unit opens in the LMS, select the linked text and verify that the correct website opens.

Add a Link to a Course Unit#

Note

When you create a link to another component, the unit of that destination component must be published for the link to work.

  1. Obtain the location ID of the unit you want to link to.

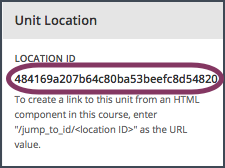
    1. In Studio, open the page for the unit that you want to link to in Studio, and then locate Unit Location in the right pane.

    2. Under Unit Location, select and copy the alphanumeric text in the Location ID field.

      The **Unit Location** area in the right pane of a unit page, with the unit's location ID circled.
  2. Open the Text component where you want to add the link.

  3. Select the text that you want to make into the link.

  4. Select the link icon in the toolbar.

  5. In the Insert link dialog box, enter a value that resembles the following value in the URL field.

    /jump_to_id/<location ID>

    Make sure to replace <location ID> (including the brackets) with the location ID that you copied in step 1, and make sure that you include both forward slashes (/).

Caution

Ensure you use /jump_to_id/<location ID> as the URL value. Do not use the URL of the unit that you see in the browser address bar. If you do not use /jump_to_id/<location ID>, the link will be broken if you export and then import the course.

  1. If you want the link to open in a new window, select the dropdown arrow next to the Open Link In… field, and then select New Window. If not, you can leave the default value.

  2. Select Insert.

  3. Save the Text component and test the link.

Add a Link to a File#

Tip

When you add links to files, open the Text component and the Files & Uploads page in separate browser windows. You can then more quickly copy file URLs.

You can add a link in a Text component to any file that is uploaded for the course. For more information about uploading files, see Adding Files to a Course.

Note

Do not use this method to add images to Text components. Instead, use the method in Add an Image to a Text Component.

  1. On the Files & Uploads page, locate the file that you want, and then select Studio in the Copy URLs column.

Note

You must use the Studio URL to link to the file, not the Web URL. For more information, see Adding Files to a Course.

  1. In the Text component where you want to add the link, select the text that you want to make into the link.

  2. In the toolbar, select the link icon.

  3. In the Insert link dialog box, paste the Studio URL for the file in the URL field. For example, the URL might resemble the following URL.

    /static/FileName.pdf

    Make sure that you include both forward slashes (/).

  4. (optional) If you want the link to open in a new window, select the dropdown arrow next to the Open Link In… field, and then select New Window. If not, you can leave the default value.

  5. Select OK.

  6. Save the Text component and test the link.

See also

Working with Text Components (reference)

Create a Text Component (how-to)

Paste without Formatting in a Text Component (how-to)

Add an Image to a Text Component (how-to)

Work with HTML Code in the Text Component (how-to)

Work with LaTeX Code (how-to)


Feedback

Contents
  • Add a Link in a Text Component
    • Add a Link to a Website
    • Add a Link to a Course Unit
    • Add a Link to a File

By Author name not set

© Copyright 2025, Axim Collaborative.